> ## Documentation Index
> Fetch the complete documentation index at: https://docs.thena.ai/llms.txt
> Use this file to discover all available pages before exploring further.
# Jira
> Connect your Thena tickets with Jira issues for seamless project management and enhanced workflow coordination.
 ## Overview
The Jira integration connects your Thena platform with Atlassian Jira, enabling seamless collaboration between customer support and development teams. This integration provides the following capabilities:
* **Ticket linking**: Connect Thena tickets with Jira issues for complete traceability
* **Issue creation**: Create new Jira issues directly from Thena tickets
* **Issue search**: Find and link existing Jira issues without leaving Thena
* **Synchronized updates**: Keep your project management and customer support systems in sync
* **Comment synchronization**: View and add comments across both Thena tickets and Jira issues
## Key features
* Connect Thena tickets to Jira issues
* View linked issues in ticket details
* Maintain bi-directional references
* Find existing Jira issues
* Filter by project and status
* Quick access to issue details
* Create new Jira issues from Thena
* Auto-populate fields from ticket data
* Select appropriate issue types
* View real-time Jira issue status
* Track priority and assignees
* Monitor issue progress
* View Jira comments in Thena tickets
* Add comments from Thena to Jira issues
* Maintain conversation context across systems
## Setup
The Jira integration uses the token of the user who authenticated it. New Jira tickets, comments will default to this user. If re-authenticated by a different user, subsequent tickets will reflect the new user. We recommend using a service account (e.g., [thena@yourdomain.com](mailto:thena@yourdomain.com), [integration-user@yourdomain.com](mailto:integration-user@yourdomain.com)) for easier identification.
1. Navigate to the [Apps studio](https://dashboard.thena.ai/organization/settings/apps-studio) in your Thena dashboard
2. Find the Jira integration in the available apps
3. Click the "Install" button to begin the installation process
1. Review the permissions and scopes required by the integration
2. Add your Jira cloud URL (e.g., [https://your-domain.atlassian.net](https://your-domain.atlassian.net))
3. Select the teams in Thena where you want to install Jira
1. After configuration, click "Complete Jira authorization"
2. You'll be redirected to Jira to authorize the connection
3. Grant the necessary permissions for the integration
4. You'll be redirected back to Thena once authorization is complete
1. Open a ticket in Thena
2. Navigate to the Jira section in the ticket details
3. Search for a Jira issue to confirm the connection is working
4. Verify that issue data is correctly displayed
## How to link a Jira issue
1. Open a ticket in Thena
2. Navigate to the Jira section in the ticket details panel
3. Click the "Search issue" button
4. Enter the Jira issue key or search by keywords
5. Select the appropriate issue from the search results
6. Click "Link" to connect the Thena ticket with the Jira issue
1. Open a ticket in Thena
2. Add a comment in any internal thread
3. Include a Jira issue link or key (e.g., PROJECT-123 or [https://your-domain.atlassian.net/browse/PROJECT-123](https://your-domain.atlassian.net/browse/PROJECT-123))
4. The system will automatically detect and link the Jira issue to your ticket
5. The linked issue will appear in the Jira section of the ticket details
If you know the exact Jira issue key (e.g., PROJECT-123):
1. Open the ticket in Thena
2. Navigate to the Jira section
3. Click "Search issue"
4. Enter the Jira issue key directly
5. Click "Link" to connect the ticket with the issue
Once linked:
* The Jira issue will appear in the ticket details panel
* You'll see the issue summary, status, priority, and assignee
* Click on the issue to open it directly in Jira
* You can also view and interact with the issue in the internal thread where the link was added
## How to search for a Jira issue
1. Open a ticket in Thena
2. Navigate to the Jira section in the ticket details
3. Click the "Search issue" button
You can search by:
* Jira issue key (e.g., PROJECT-123)
* Keywords in the issue summary or description
* Project name or key
1. Review the search results showing issue summaries and statuses
2. Click "Link" to connect the selected issue with your Thena ticket
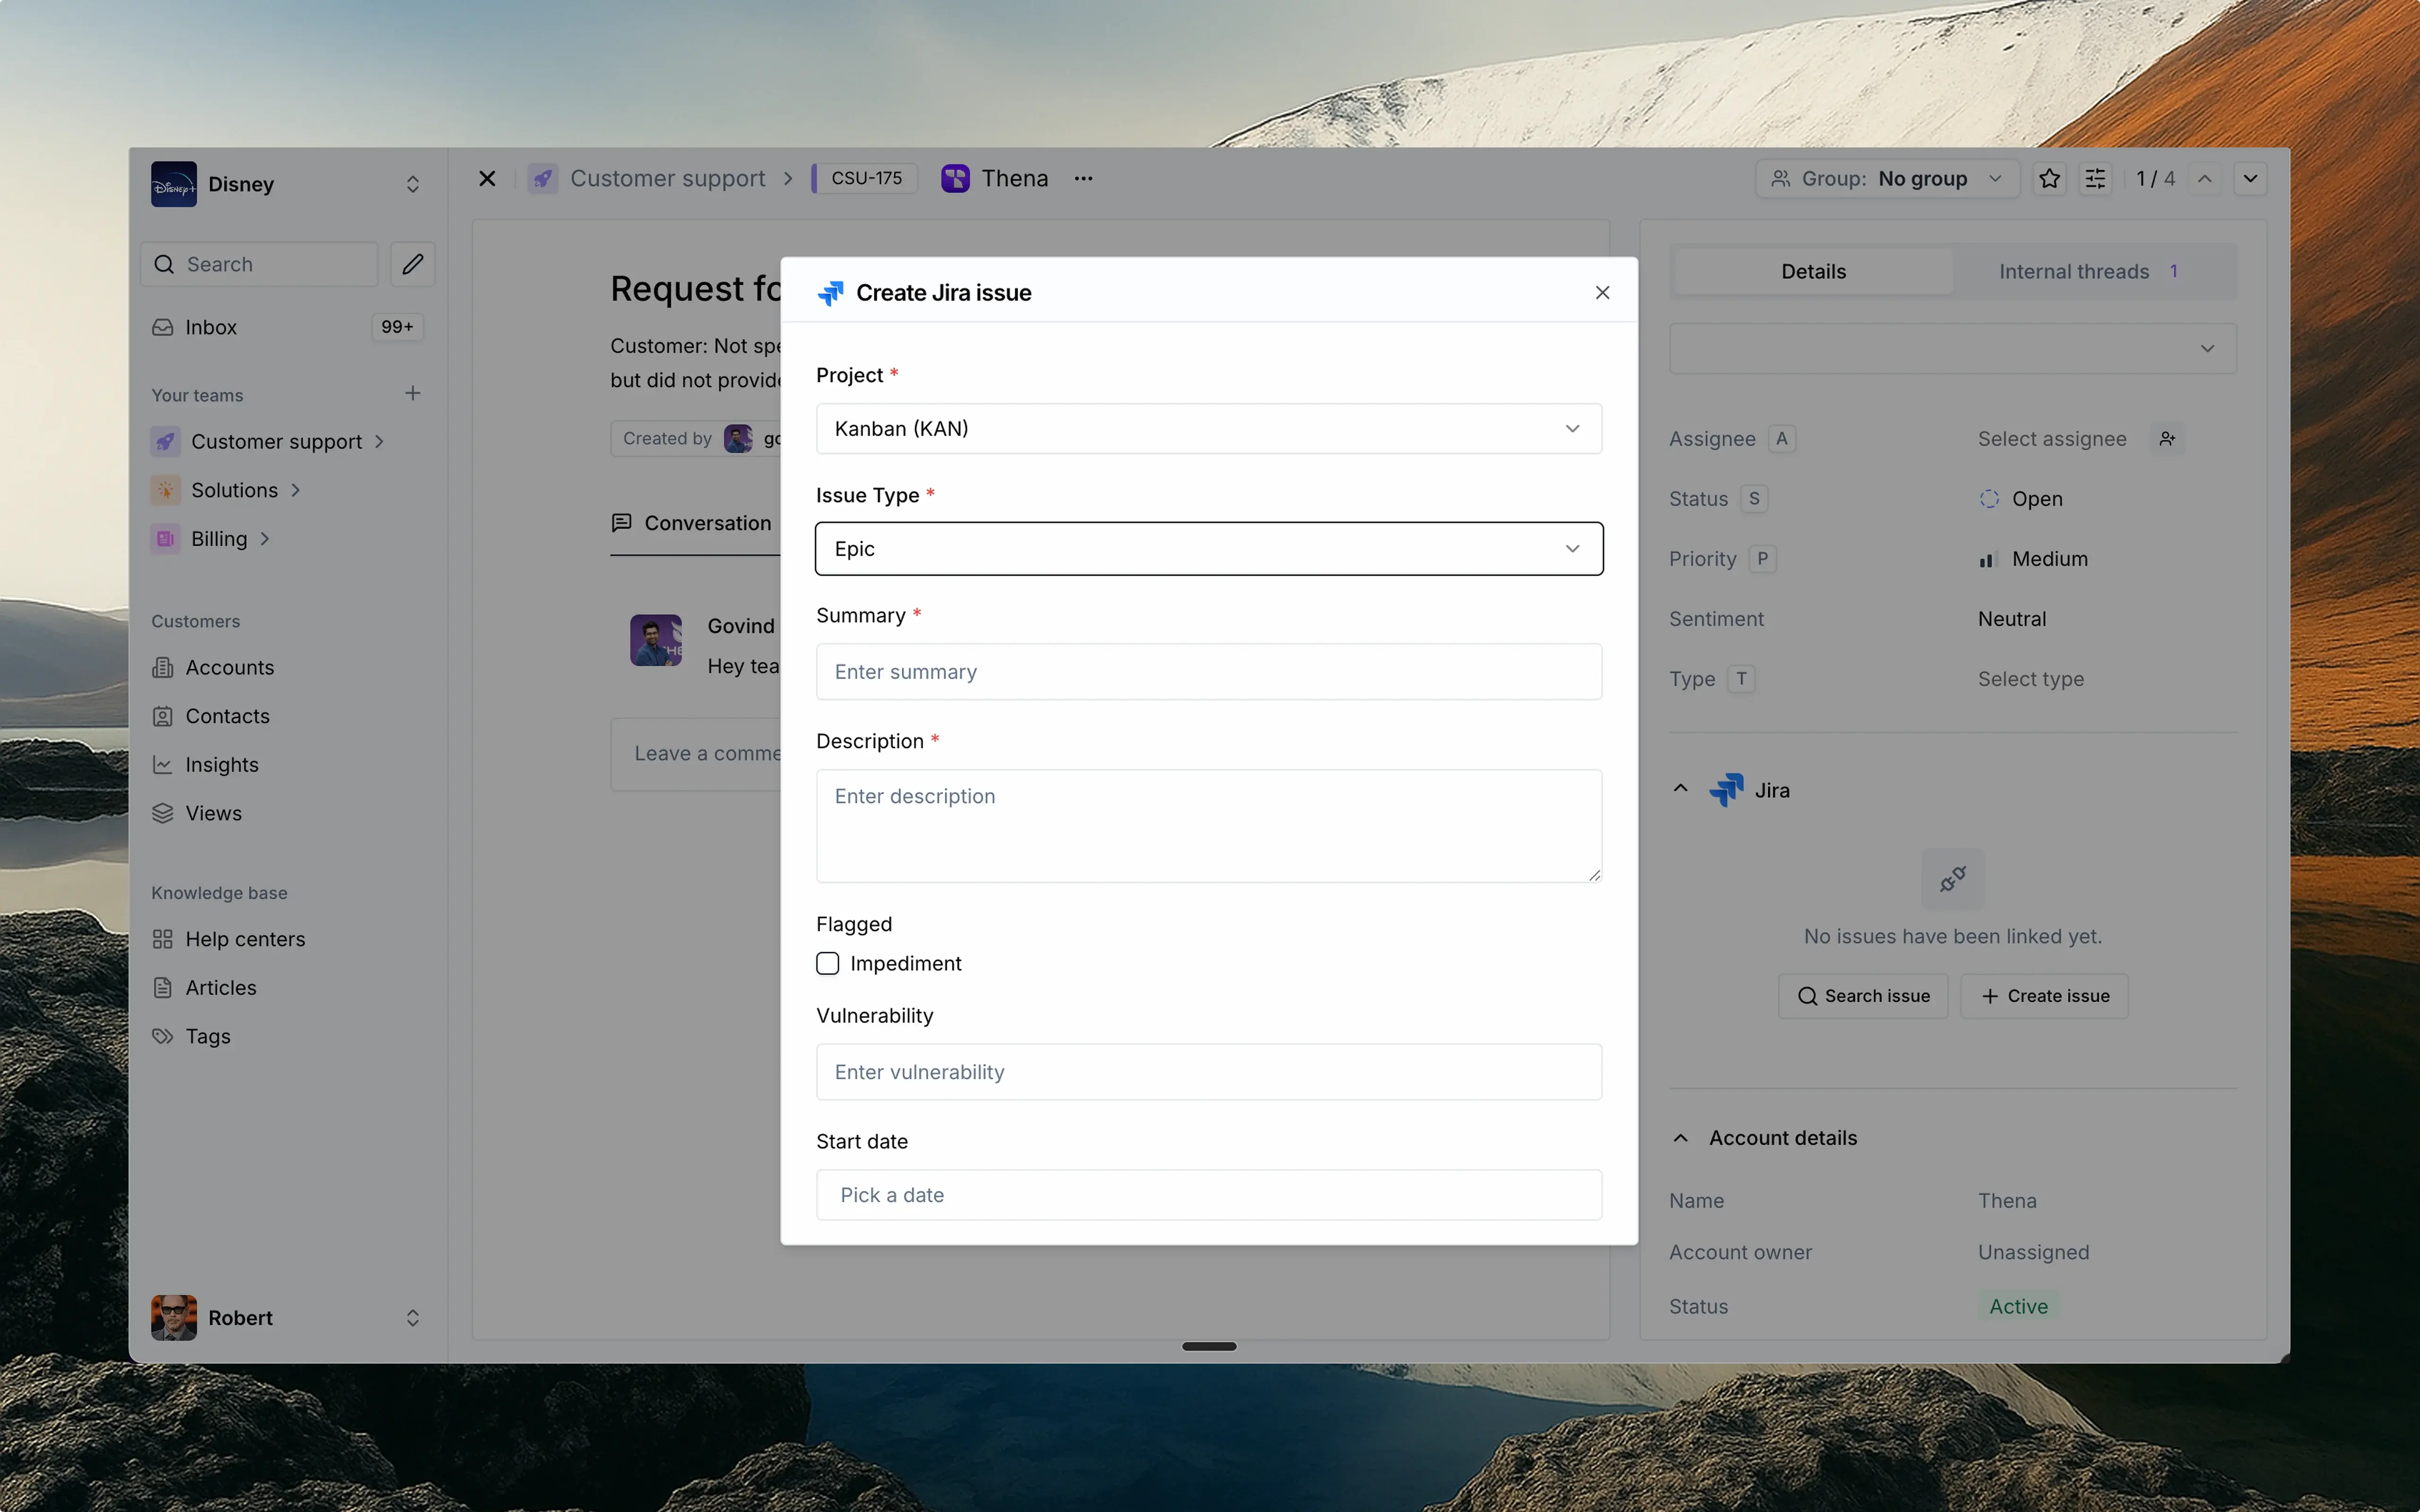
## How to create a Jira issue
1. Open a ticket in Thena
2. Navigate to the Jira section in the ticket details
3. Click the "Create issue" button
1. Choose the appropriate Jira project from the dropdown
2. Select the issue type (Bug, Task, Story, etc.)
3. The available fields will update based on your selections
1. Enter the issue summary
2. Provide a detailed description
3. Set priority, status, and other required fields
4. Add any custom fields specific to your Jira configuration
1. Review all entered information
2. Click "Create issue" to submit to Jira
3. The new issue will be automatically linked to your Thena ticket
4. You'll see the issue details in the ticket panel once created
5. An internal thread will be created where you can add comments to the Jira issue directly from Thena
## How to synchronize comments
1. Open a ticket with a linked Jira issue in Thena
2. Navigate to the internal thread created for the Jira issue
3. Type your comment in the message field (supports rich text)
4. Send the message
5. Your comment will appear in both the Thena thread and the Jira issue
6. In Jira, the comment will be prefixed with "Message from \[your-name] via Thena"
1. When someone adds a comment to a linked Jira issue
2. The comment will automatically appear in the corresponding Thena thread
3. The comment will show the Jira user's name who created it
4. All team members with access to the ticket can view these comments
1. Text-based comments synchronize in both directions
2. Attachments added in Jira will be visible in Thena as inline attachments
3. Attachments added in Thena will be visible in Jira as a link
4. To add attachments to Jira, use the Jira slash (/) command
## Permission scopes
The Jira app requires specific permissions to function properly. When authorizing the app, you'll be asked to grant the following permission scopes:
Take Jira administration actions including:
* Create projects and custom fields
* View workflows
* Configure integration settings
Create and edit project settings and project-level objects such as:
* Versions and components
* Project configurations
* Project-specific settings
Manage Jira webhooks to enable real-time updates:
* Fetch and register webhooks
* Refresh webhook configurations
* Delete webhooks when no longer needed
Read access to Jira data including:
* Project information and structure
* Issue data and metadata
* Attachments and worklogs
* Search functionality
Access to view comment properties:
* Comment metadata
* Comment relationships
* Comment visibility settings
Write access to Jira data including:
* Create and edit issues
* Post comments as the authenticated user
* Create worklogs for time tracking
* Delete issues when necessary
Ability to manage comment properties:
* Create new comment properties
* Update existing properties
* Manage comment metadata
## FAQs
Yes, you can link multiple Jira issues to a single Thena ticket. Each linked issue will appear in the Jira section of the ticket details panel, allowing you to track multiple related issues.
When a linked Jira issue is updated, the changes will be reflected in the Thena ticket details. This includes updates to status, priority, assignee, and other issue details. The synchronization happens in real-time, ensuring you always have the latest information.
Currently, the integration displays standard Jira fields including summary, description, status, priority, and assignee. Custom field display options may be available in future updates.
You need:
* View permissions for the projects you want to access
* Create issue permissions if you want to create new issues
* Edit permissions if you want to update existing issues
The integration will respect the permissions of the authenticated Jira user.
Yes, you can unlink a Jira issue from a Thena ticket by clicking the unlink button next to the linked issue in the ticket details panel. This will remove the reference in Thena but will not affect the Jira issue itself.
There is no specific limit imposed by the Thena integration on the number of Jira issues you can link or create. However, be mindful of any API rate limits that may be enforced by your Jira instance.
Jira does not allow sending messages via bots, so comments will be sent as the user who integrated the app. We recommend using a generic user for the integration such as integration-user or Thena.
The messages going to Jira will be prefixed with "Message from \[user-name] via Thena" for easy identification.
Comments from Jira will appear in Thena as messages from the Jira integration, with the name of the Jira user who created the comment clearly indicated.
## Overview
The Jira integration connects your Thena platform with Atlassian Jira, enabling seamless collaboration between customer support and development teams. This integration provides the following capabilities:
* **Ticket linking**: Connect Thena tickets with Jira issues for complete traceability
* **Issue creation**: Create new Jira issues directly from Thena tickets
* **Issue search**: Find and link existing Jira issues without leaving Thena
* **Synchronized updates**: Keep your project management and customer support systems in sync
* **Comment synchronization**: View and add comments across both Thena tickets and Jira issues
## Key features
* Connect Thena tickets to Jira issues
* View linked issues in ticket details
* Maintain bi-directional references
* Find existing Jira issues
* Filter by project and status
* Quick access to issue details
* Create new Jira issues from Thena
* Auto-populate fields from ticket data
* Select appropriate issue types
* View real-time Jira issue status
* Track priority and assignees
* Monitor issue progress
* View Jira comments in Thena tickets
* Add comments from Thena to Jira issues
* Maintain conversation context across systems
## Setup
The Jira integration uses the token of the user who authenticated it. New Jira tickets, comments will default to this user. If re-authenticated by a different user, subsequent tickets will reflect the new user. We recommend using a service account (e.g., [thena@yourdomain.com](mailto:thena@yourdomain.com), [integration-user@yourdomain.com](mailto:integration-user@yourdomain.com)) for easier identification.
1. Navigate to the [Apps studio](https://dashboard.thena.ai/organization/settings/apps-studio) in your Thena dashboard
2. Find the Jira integration in the available apps
3. Click the "Install" button to begin the installation process
1. Review the permissions and scopes required by the integration
2. Add your Jira cloud URL (e.g., [https://your-domain.atlassian.net](https://your-domain.atlassian.net))
3. Select the teams in Thena where you want to install Jira
1. After configuration, click "Complete Jira authorization"
2. You'll be redirected to Jira to authorize the connection
3. Grant the necessary permissions for the integration
4. You'll be redirected back to Thena once authorization is complete
1. Open a ticket in Thena
2. Navigate to the Jira section in the ticket details
3. Search for a Jira issue to confirm the connection is working
4. Verify that issue data is correctly displayed
## How to link a Jira issue
1. Open a ticket in Thena
2. Navigate to the Jira section in the ticket details panel
3. Click the "Search issue" button
4. Enter the Jira issue key or search by keywords
5. Select the appropriate issue from the search results
6. Click "Link" to connect the Thena ticket with the Jira issue
1. Open a ticket in Thena
2. Add a comment in any internal thread
3. Include a Jira issue link or key (e.g., PROJECT-123 or [https://your-domain.atlassian.net/browse/PROJECT-123](https://your-domain.atlassian.net/browse/PROJECT-123))
4. The system will automatically detect and link the Jira issue to your ticket
5. The linked issue will appear in the Jira section of the ticket details
If you know the exact Jira issue key (e.g., PROJECT-123):
1. Open the ticket in Thena
2. Navigate to the Jira section
3. Click "Search issue"
4. Enter the Jira issue key directly
5. Click "Link" to connect the ticket with the issue
Once linked:
* The Jira issue will appear in the ticket details panel
* You'll see the issue summary, status, priority, and assignee
* Click on the issue to open it directly in Jira
* You can also view and interact with the issue in the internal thread where the link was added
## How to search for a Jira issue
1. Open a ticket in Thena
2. Navigate to the Jira section in the ticket details
3. Click the "Search issue" button
You can search by:
* Jira issue key (e.g., PROJECT-123)
* Keywords in the issue summary or description
* Project name or key
1. Review the search results showing issue summaries and statuses
2. Click "Link" to connect the selected issue with your Thena ticket
## How to create a Jira issue
1. Open a ticket in Thena
2. Navigate to the Jira section in the ticket details
3. Click the "Create issue" button
1. Choose the appropriate Jira project from the dropdown
2. Select the issue type (Bug, Task, Story, etc.)
3. The available fields will update based on your selections
1. Enter the issue summary
2. Provide a detailed description
3. Set priority, status, and other required fields
4. Add any custom fields specific to your Jira configuration
1. Review all entered information
2. Click "Create issue" to submit to Jira
3. The new issue will be automatically linked to your Thena ticket
4. You'll see the issue details in the ticket panel once created
5. An internal thread will be created where you can add comments to the Jira issue directly from Thena
## How to synchronize comments
1. Open a ticket with a linked Jira issue in Thena
2. Navigate to the internal thread created for the Jira issue
3. Type your comment in the message field (supports rich text)
4. Send the message
5. Your comment will appear in both the Thena thread and the Jira issue
6. In Jira, the comment will be prefixed with "Message from \[your-name] via Thena"
1. When someone adds a comment to a linked Jira issue
2. The comment will automatically appear in the corresponding Thena thread
3. The comment will show the Jira user's name who created it
4. All team members with access to the ticket can view these comments
1. Text-based comments synchronize in both directions
2. Attachments added in Jira will be visible in Thena as inline attachments
3. Attachments added in Thena will be visible in Jira as a link
4. To add attachments to Jira, use the Jira slash (/) command
## Permission scopes
The Jira app requires specific permissions to function properly. When authorizing the app, you'll be asked to grant the following permission scopes:
Take Jira administration actions including:
* Create projects and custom fields
* View workflows
* Configure integration settings
Create and edit project settings and project-level objects such as:
* Versions and components
* Project configurations
* Project-specific settings
Manage Jira webhooks to enable real-time updates:
* Fetch and register webhooks
* Refresh webhook configurations
* Delete webhooks when no longer needed
Read access to Jira data including:
* Project information and structure
* Issue data and metadata
* Attachments and worklogs
* Search functionality
Access to view comment properties:
* Comment metadata
* Comment relationships
* Comment visibility settings
Write access to Jira data including:
* Create and edit issues
* Post comments as the authenticated user
* Create worklogs for time tracking
* Delete issues when necessary
Ability to manage comment properties:
* Create new comment properties
* Update existing properties
* Manage comment metadata
## FAQs
Yes, you can link multiple Jira issues to a single Thena ticket. Each linked issue will appear in the Jira section of the ticket details panel, allowing you to track multiple related issues.
When a linked Jira issue is updated, the changes will be reflected in the Thena ticket details. This includes updates to status, priority, assignee, and other issue details. The synchronization happens in real-time, ensuring you always have the latest information.
Currently, the integration displays standard Jira fields including summary, description, status, priority, and assignee. Custom field display options may be available in future updates.
You need:
* View permissions for the projects you want to access
* Create issue permissions if you want to create new issues
* Edit permissions if you want to update existing issues
The integration will respect the permissions of the authenticated Jira user.
Yes, you can unlink a Jira issue from a Thena ticket by clicking the unlink button next to the linked issue in the ticket details panel. This will remove the reference in Thena but will not affect the Jira issue itself.
There is no specific limit imposed by the Thena integration on the number of Jira issues you can link or create. However, be mindful of any API rate limits that may be enforced by your Jira instance.
Jira does not allow sending messages via bots, so comments will be sent as the user who integrated the app. We recommend using a generic user for the integration such as integration-user or Thena.
The messages going to Jira will be prefixed with "Message from \[user-name] via Thena" for easy identification.
Comments from Jira will appear in Thena as messages from the Jira integration, with the name of the Jira user who created the comment clearly indicated.