> ## Documentation Index
> Fetch the complete documentation index at: https://docs.thena.ai/llms.txt
> Use this file to discover all available pages before exploring further.

# Web chat

> AI-native support experience embedded into any website or web app

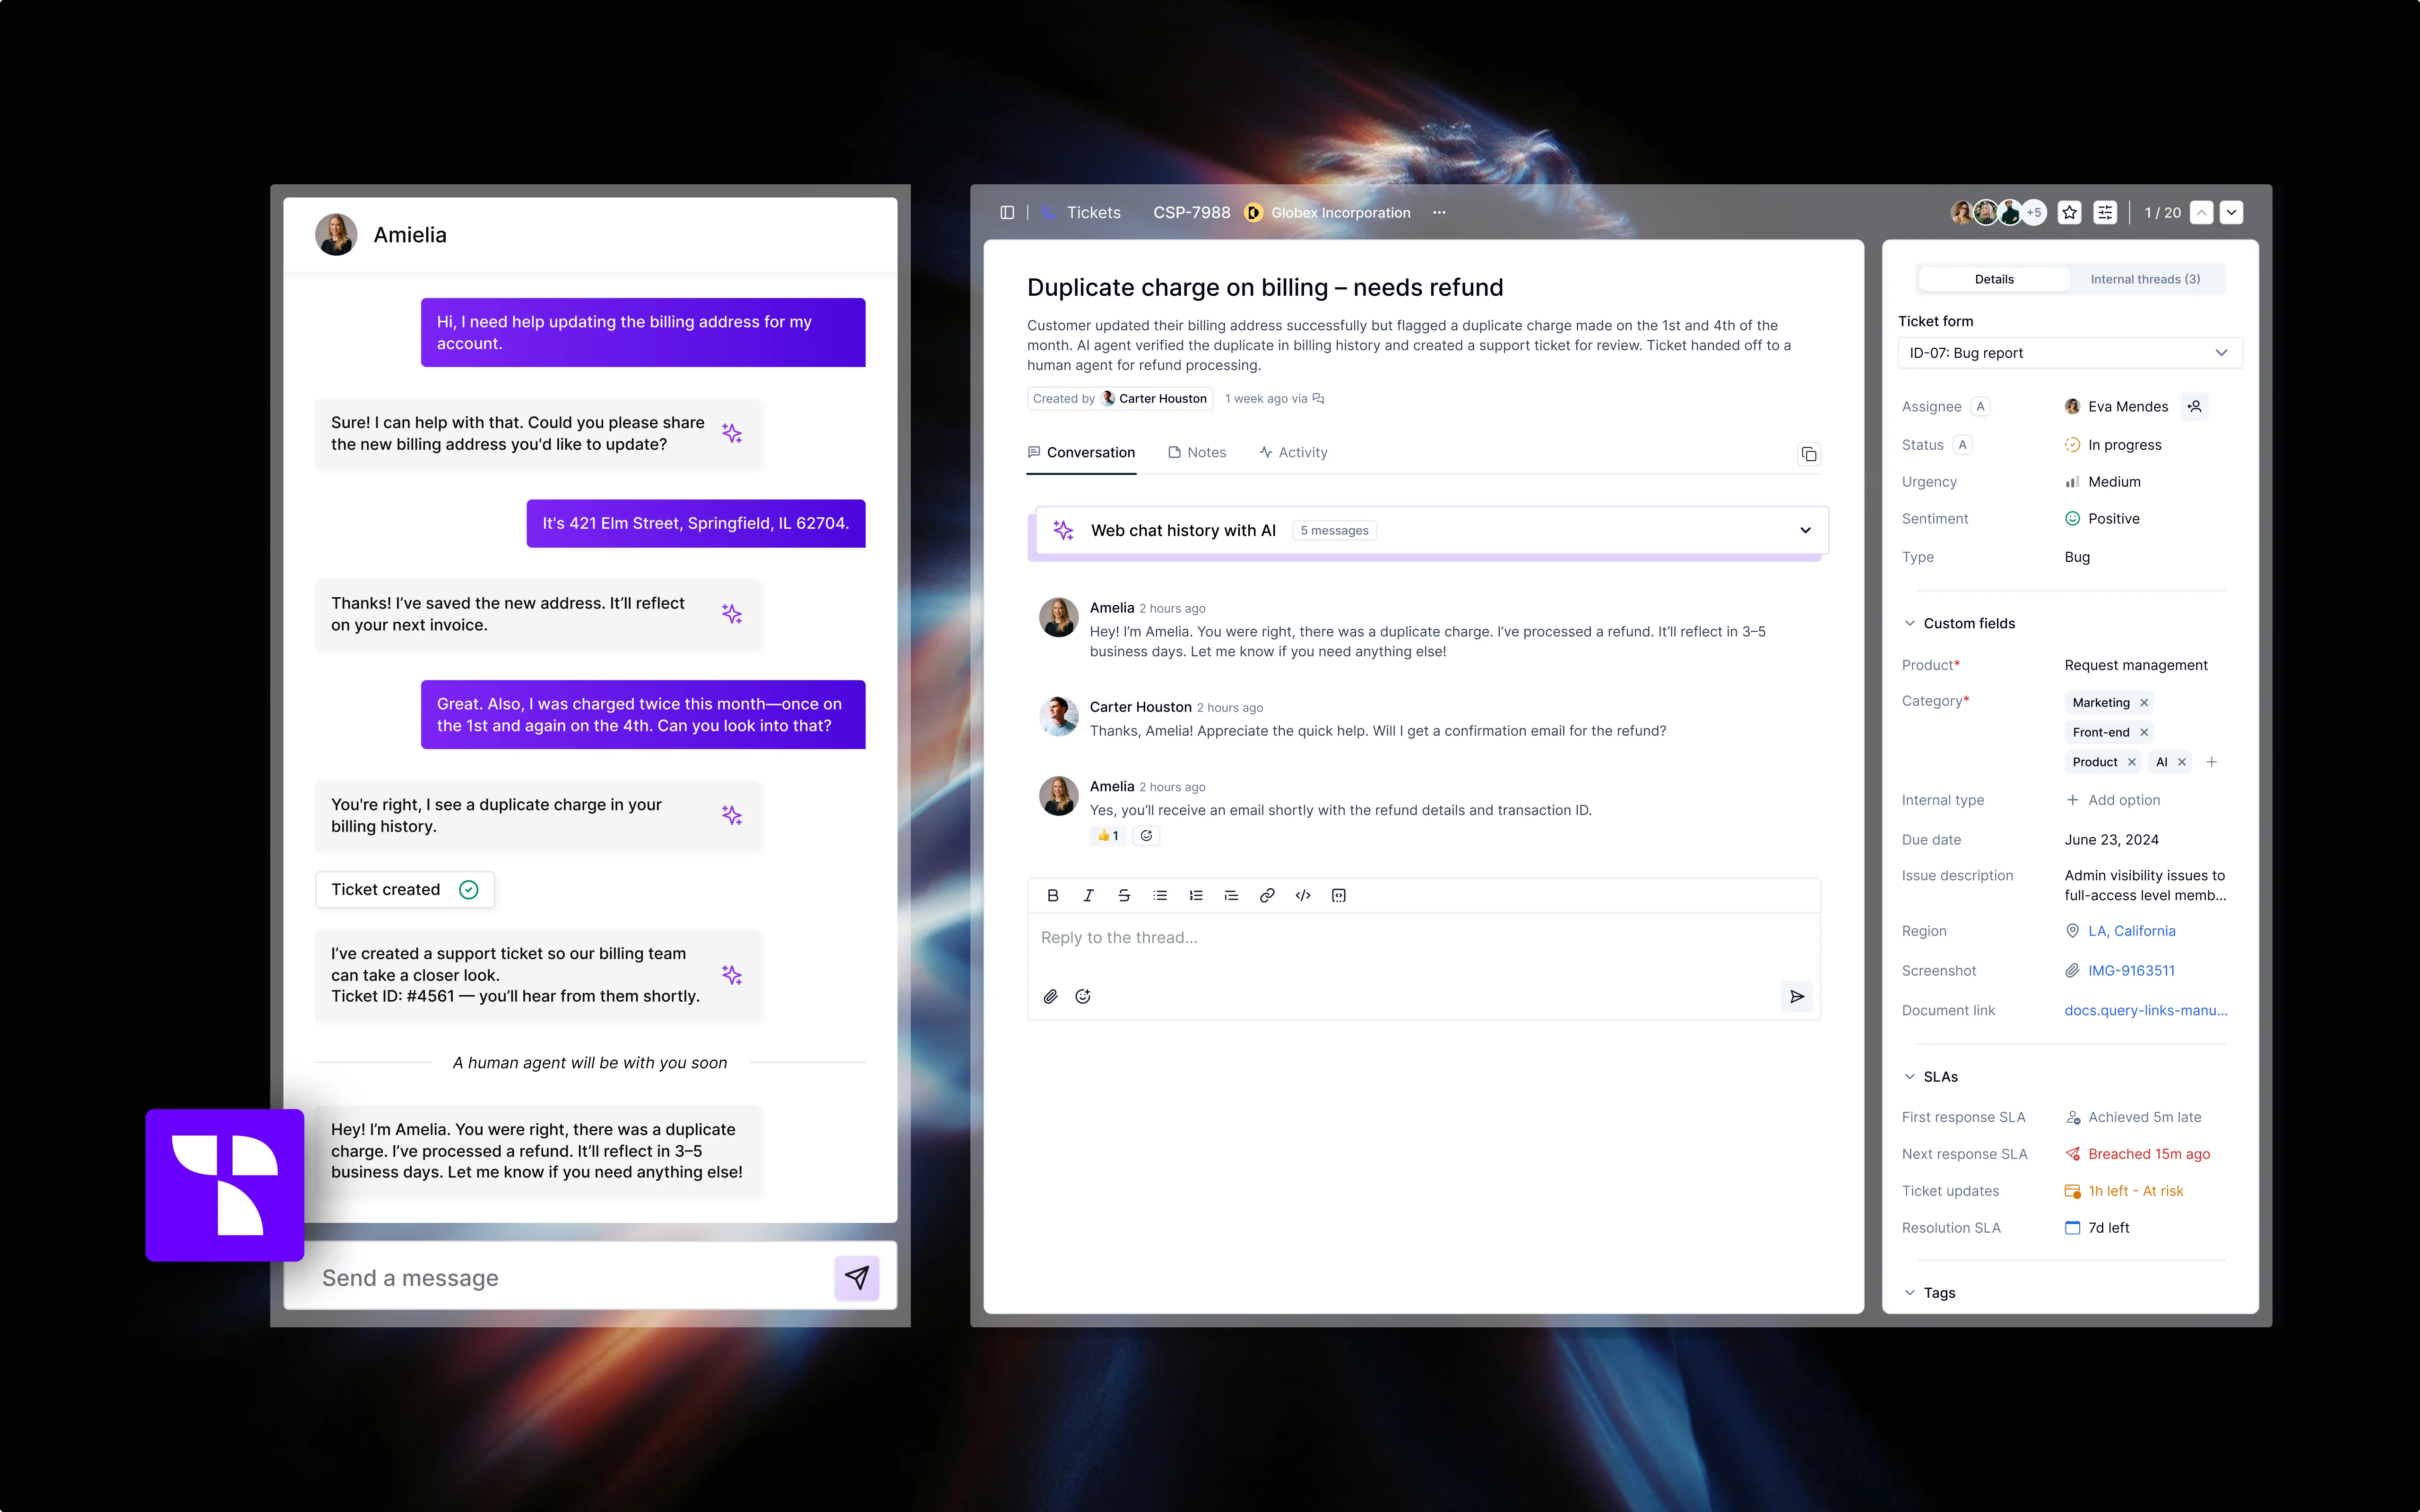
<img src="https://mintcdn.com/thena-840ce5ec/fnPhXvYfm-TNmZho/images/docs/Web-chat1.webp?fit=max&auto=format&n=fnPhXvYfm-TNmZho&q=85&s=c0db0a83acff21b760f59b269008e98b" alt="Web Chat" width="5120" height="3200" data-path="images/docs/Web-chat1.webp" />

The Web Chat widget is an AI-native support experience that can be embedded into any website or web app. It empowers users to engage instantly with an AI agent who can respond using your uploaded documentation, and if needed, gracefully hand off to a human agent by creating a support ticket.

<Card title="Key benefits" icon="star">
  <style jsx>
    {`
          svg {
            color: #6A00FF !important;
            fill: #6A00FF !important;
          }
        `}
  </style>

  <ul className="ml-6 space-y-2">
    <li>Instant AI-powered responses using your own documentation</li>
    <li>Seamless handoff to human agents when needed</li>
    <li>Fully customizable appearance to match your brand</li>
    <li>Easy deployment with a simple JavaScript snippet</li>
  </ul>
</Card>

## Setup guide

Follow these simple steps to enable Web chat for your organization:

1. Go to Organization > Click Sources
2. Enable Web chat > Select team
3. Once you are in Team settings > Configure how you want Web chat to look like
4. Once that is done, just Copy the script and deploy it in your End of `<body>` tag

<Steps>
  <Step title="Customize the widget's appearance">
    You can configure how the widget looks to match your brand's identity and design guidelines.

    <div className="feature-container">
      <div className="feature-item">
        <span className="inline-flex items-center justify-center w-10 h-10 rounded-full bg-purple-100">
          <svg className="w-6 h-6 text-purple-600" xmlns="http://www.w3.org/2000/svg" viewBox="0 0 24 24" fill="currentColor">
            <path d="M12 2C6.48 2 2 6.48 2 12s4.48 10 10 10 10-4.48 10-10S17.52 2 12 2zm0 18c-4.41 0-8-3.59-8-8s3.59-8 8-8 8 3.59 8 8-3.59 8-8 8zm-5-9h10v2H7z" />
          </svg>
        </span>

        <h3 className="text-lg font-semibold mb-2 mt-2">Logo</h3>
        <p>Add your company's logo using a public URL. Supported formats include SVG, PNG, JPG, JPEG, and WebP. This logo appears at the top of the chat interface for a fully branded experience.</p>
      </div>

      <div className="feature-item">
        <span className="inline-flex items-center justify-center w-10 h-10 rounded-full bg-purple-100">
          <svg className="w-6 h-6 text-purple-600" xmlns="http://www.w3.org/2000/svg" viewBox="0 0 24 24" fill="currentColor">
            <path d="M12 22C6.49 22 2 17.51 2 12S6.49 2 12 2s10 4.04 10 9c0 3.31-2.69 6-6 6h-1.77c-.28 0-.5.22-.5.5 0 .12.05.23.13.33.41.47.64 1.06.64 1.67A2.5 2.5 0 0 1 12 22zm0-18c-4.41 0-8 3.59-8 8s3.59 8 8 8c.28 0 .5-.22.5-.5a.54.54 0 0 0-.14-.35c-.41-.46-.63-1.05-.63-1.65a2.5 2.5 0 0 1 2.5-2.5H16c2.21 0 4-1.79 4-4 0-3.86-3.59-7-8-7z" />
          </svg>
        </span>

        <h3 className="text-lg font-semibold mb-2 mt-2">Theme color</h3>
        <p>Set a start and end hex color to define your theme gradient. You can use a solid color (by leaving the end color empty) or a gradient with a custom direction (e.g., 135deg).</p>
      </div>

      <div className="feature-item">
        <span className="inline-flex items-center justify-center w-10 h-10 rounded-full bg-purple-100">
          <svg className="w-6 h-6 text-purple-600" xmlns="http://www.w3.org/2000/svg" viewBox="0 0 24 24" fill="currentColor">
            <path d="M3 3v18h18V3H3zm16 16H5V5h14v14zM11 7h2v2h-2V7zm0 4h2v2h-2v-2zm0 4h2v2h-2v-2z" />
          </svg>
        </span>

        <h3 className="text-lg font-semibold mb-2 mt-2">Position on screen</h3>
        <p>Choose where the chat widget appears. The default is bottom right, but other positions are available depending on your site layout.</p>
      </div>

      <div className="feature-item">
        <span className="inline-flex items-center justify-center w-10 h-10 rounded-full bg-purple-100">
          <svg className="w-6 h-6 text-purple-600" xmlns="http://www.w3.org/2000/svg" viewBox="0 0 24 24" fill="currentColor">
            <path d="M19 3H5c-1.1 0-2 .9-2 2v14c0 1.1.9 2 2 2h14c1.1 0 2-.9 2-2V5c0-1.1-.9-2-2-2zm0 16H5V5h14v14zM7 10h2v7H7zm4-3h2v10h-2zm4 6h2v4h-2z" />
          </svg>
        </span>

        <h3 className="text-lg font-semibold mb-2 mt-2">Widget type</h3>
        <p>Select between Thena's default widget or link the chat experience to a custom launcher on your site.</p>
      </div>

      <div className="feature-item">
        <span className="inline-flex items-center justify-center w-10 h-10 rounded-full bg-purple-100">
          <svg className="w-6 h-6 text-purple-600" xmlns="http://www.w3.org/2000/svg" viewBox="0 0 24 24" fill="currentColor">
            <path d="M17.65 6.35C16.2 4.9 14.21 4 12 4c-4.42 0-7.99 3.58-7.99 8s3.57 8 7.99 8c3.73 0 6.84-2.55 7.73-6h-2.08c-.82 2.33-3.04 4-5.65 4-3.31 0-6-2.69-6-6s2.69-6 6-6c1.66 0 3.14.69 4.22 1.78L13 11h7V4l-2.35 2.35z" />
          </svg>
        </span>

        <h3 className="text-lg font-semibold mb-2 mt-2">Behavior toggles</h3>

        <div>
          <ul className="space-y-2">
            <li><strong>Use custom launcher button</strong>: Replace the default launcher with your own UI element.</li>
            <li><strong>Initial dark mode</strong>: Automatically open the widget in dark mode.</li>
            <li><strong>Auto-close on outside click</strong>: Automatically close the chat when users click outside the widget.</li>
          </ul>
        </div>
      </div>
    </div>
  </Step>

  <Step title="Control behavior with a custom prompt">
    You can shape how the AI agent interacts by configuring its prompt under the "Agent configuration prompt" section. This allows you to:

    <div className="feature-container">
      <div className="feature-item">
        <ul className="space-y-2 mt-2">
          <li><p><strong>Define the tone and style of communication:</strong> Ensure the AI's personality aligns with your brand voice.</p></li>
          <li><p><strong>Set boundaries:</strong> Control what the AI can and cannot discuss to keep conversations on-topic.</p></li>
          <li><p><strong>Guide responses:</strong> Instruct the AI on how to handle specific types of queries for consistent support.</p></li>
        </ul>

        <p className="mt-2">The prompt acts as instructions for your AI agent, making it feel less robotic and more like a genuine brand ambassador for your company.</p>
      </div>
    </div>
  </Step>

  <Step title="Deploy the widget">
    <div className="feature-container">
      <div className="feature-item">
        <span className="inline-flex items-center justify-center w-10 h-10 rounded-full bg-purple-100">
          <svg className="w-6 h-6 text-purple-600" xmlns="http://www.w3.org/2000/svg" viewBox="0 0 24 24" fill="currentColor">
            <path d="M19 19H5V5h7V3H5c-1.11 0-2 .9-2 2v14c0 1.1.89 2 2 2h14c1.1 0 2-.9 2-2v-7h-2v7zM14 3v2h3.59l-9.83 9.83 1.41 1.41L19 6.41V10h2V3h-7z" />
          </svg>
        </span>

        <h3 className="text-lg font-semibold mb-2 mt-2">Allowed domains</h3>
        <p>You must specify allowed domains to secure your deployment. These should include the full URL (http or https) for each site where the widget will be embedded.</p>
      </div>

      <div className="feature-item">
        <span className="inline-flex items-center justify-center w-10 h-10 rounded-full bg-purple-100">
          <svg className="w-6 h-6 text-purple-600" xmlns="http://www.w3.org/2000/svg" viewBox="0 0 24 24" fill="currentColor">
            <path d="M9.4 16.6L4.8 12l4.6-4.6L8 6l-6 6 6 6 1.4-1.4zm5.2 0l4.6-4.6-4.6-4.6L16 6l6 6-6 6-1.4-1.4z" />
          </svg>
        </span>

        <h3 className="text-lg font-semibold mb-2 mt-2">Installation code</h3>
        <p>Once you've configured the widget, you'll get a JavaScript snippet to add to your website. This code includes:</p>

        <ul className="space-y-2 mt-2">
          <li>Your unique widget ID</li>
          <li>Color configuration and UI behavior (e.g., gradient direction, dark mode)</li>
          <li>Optionally, HMAC-based verification for secure identity handling</li>
        </ul>

        <h4 className="text-lg font-semibold mb-3 mt-6">HMAC Authentication for User Identity</h4>
        <p>For enhanced security, you can use HMAC (Hash-based Message Authentication Code) to verify user identities. This prevents unauthorized users from impersonating others in your chat widget.</p>

        <p className="mt-4"><strong>Step 1: Generate the HMAC hash on your server</strong></p>
        <p>You need to hash the pair of email:username with your HMAC secret. Here's a sample implementation:</p>

        ```typescript theme={null}
        const generateHmac = (email: string, name: string): string => {
          const hmacSecret = <<YOUR_HMAC_SECRET>>;
          const message = `${email}:${name}`;
          return crypto
            .createHmac("sha256", hmacSecret)
            .update(message)
            .digest("hex");
        };
        ```

        <p className="mt-4"><strong>Step 2: Include the hash in your widget configuration</strong></p>
        <p>This hash is then sent in the SDK initialization code as shown below:</p>

        ```html theme={null}
        <script>
          window.thenaWidget = {
            baseUrl: 'https://agent-studio.thena.ai',
            apiKey: 'API_KEY',
            agentId: 'AGENT_ID',
            wsEndpoint: 'wss://agent-studio.thena.ai',
            useCustomLauncher: false,
            user: {
              email: 'test@example.com',
              name: 'Test User (HMAC)',
              hash: 'YOUR_SERVER_SIDE_GENERATED_HMAC_HASH'
            },
            themeColorStart: '#3B82F6',
            themeColorEnd: '#1D4ED8',
            gradientDirection: '135deg',
            darkMode: false,
            autoclose: false
          };
        </script>
        <script src="https://widget.thena.ai/shim.js"></script>
        ```

        <Note>
          The HMAC hash must be generated server-side using the format `email:username` and your secret key. Never expose your HMAC secret in client-side code.
        </Note>
      </div>

      <div className="security-note">
        <div className="important-note">
          <span className="inline-flex items-center justify-center w-10 h-10 rounded-full bg-red-100">
            <svg className="w-6 h-6 text-red-600" xmlns="http://www.w3.org/2000/svg" viewBox="0 0 24 24" fill="currentColor">
              <path d="M12 1L3 5v6c0 5.55 3.84 10.74 9 12 5.16-1.26 9-6.45 9-12V5l-9-4zm0 10.99h7c-.53 4.12-3.28 7.79-7 8.94V12H5V6.3l7-3.11v8.8z" />
            </svg>
          </span>

          <h3 className="text-lg font-semibold mb-2 mt-2">Security considerations</h3>
          <p>The HMAC secret key is shown only once and must never be exposed in client-side code. Store it securely on your server and use it to generate valid hashes.</p>
        </div>
      </div>
    </div>
  </Step>

  <Step title="Experience the live chat flow">
    <div className="feature-container">
      <div className="feature-item">
        <span className="inline-flex items-center justify-center w-10 h-10 rounded-full bg-purple-100">
          <svg className="w-6 h-6 text-purple-600" xmlns="http://www.w3.org/2000/svg" viewBox="0 0 24 24" fill="currentColor">
            <path d="M21 6h-2v9H6v2c0 .55.45 1 1 1h11l4 4V7c0-.55-.45-1-1-1zm-4 6V3c0-.55-.45-1-1-1H3c-.55 0-1 .45-1 1v14l4-4h10c.55 0 1-.45 1-1z" />
          </svg>
        </span>

        <h3 className="text-lg font-semibold mb-2 mt-2">Chat Widget</h3>
        <p>Once the widget is deployed, your users can interact with it directly from your website.</p>
      </div>

      <div className="feature-item">
        <span className="inline-flex items-center justify-center w-10 h-10 rounded-full bg-purple-100">
          <svg className="w-6 h-6 text-purple-600" xmlns="http://www.w3.org/2000/svg" viewBox="0 0 24 24" fill="currentColor">
            <path d="M21.99 4c0-1.1-.89-2-1.99-2H4c-1.1 0-2 .9-2 2v12c0 1.1.9 2 2 2h14l4 4-.01-18zM17 11h-4v4h-2v-4H7V9h4V5h2v4h4v2z" />
          </svg>
        </span>

        <h3 className="text-lg font-semibold mb-2 mt-2">AI-native interactions</h3>
        <p>The AI agent responds using your uploaded documentation and custom prompt. Whether it's FAQs, onboarding steps, or advanced product guidance, your AI agent becomes a 24/7 frontline support companion.</p>
      </div>

      <div className="feature-item">
        <span className="inline-flex items-center justify-center w-10 h-10 rounded-full bg-purple-100">
          <svg className="w-6 h-6 text-purple-600" xmlns="http://www.w3.org/2000/svg" viewBox="0 0 24 24" fill="currentColor">
            <path d="M16 11c1.66 0 2.99-1.34 2.99-3S17.66 5 16 5c-1.66 0-3 1.34-3 3s1.34 3 3 3zm-8 0c1.66 0 2.99-1.34 2.99-3S9.66 5 8 5C6.34 5 5 6.34 5 8s1.34 3 3 3zm0 2c-2.33 0-7 1.17-7 3.5V19h14v-2.5c0-2.33-4.67-3.5-7-3.5zm8 0c-.29 0-.62.02-.97.05 1.16.84 1.97 1.97 1.97 3.45V19h6v-2.5c0-2.33-4.67-3.5-7-3.5z" />
          </svg>
        </span>

        <h3 className="text-lg font-semibold mb-2 mt-2">Human agent handoff</h3>
        <p>When needed, the AI can initiate a handoff by creating a support ticket. Once a ticket is created:</p>

        <ul className="space-y-2 mt-2">
          <li>The conversation is logged.</li>
          <li>A human agent can take over the chat seamlessly from within the same widget.</li>
          <li>The user experiences no disruption in their conversation.</li>
        </ul>

        <p className="mt-2">As seen in the example with James, the AI agent gathered initial input, created a ticket, and handed it off to Jackson, a real human agent.</p>
      </div>

      <div className="feature-item">
        <span className="inline-flex items-center justify-center w-10 h-10 rounded-full bg-purple-100">
          <svg className="w-6 h-6 text-purple-600" xmlns="http://www.w3.org/2000/svg" viewBox="0 0 24 24" fill="currentColor">
            <path d="M21.41 11.58l-9-9C12.05 2.22 11.55 2 11 2H4c-1.1 0-2 .9-2 2v7c0 .55.22 1.05.59 1.42l9 9c.36.36.86.58 1.41.58s1.05-.22 1.41-.59l7-7c.37-.36.59-.86.59-1.41s-.22-1.05-.59-1.42zM5.5 7C4.67 7 4 6.33 4 5.5S4.67 4 5.5 4 7 4.67 7 5.5 6.33 7 5.5 7z" />
          </svg>
        </span>

        <h3 className="text-lg font-semibold mb-2 mt-2">Image attachments</h3>
        <p>The Web chat widget supports image attachments, allowing users to share visuals for clearer communication. Supported formats include PNG, JPEG/JPG, GIF (non-animated), WebP, and BMP (partial support).</p>
        <p className="mt-2">We'll be expanding support for additional file types in future updates.</p>
      </div>

      <div className="feature-item">
        <span className="inline-flex items-center justify-center w-10 h-10 rounded-full bg-purple-100">
          <svg className="w-6 h-6 text-purple-600" xmlns="http://www.w3.org/2000/svg" viewBox="0 0 24 24" fill="currentColor">
            <path d="M12 22c1.1 0 2-.9 2-2h-4c0 1.1.9 2 2 2zm6-6v-5c0-3.07-1.63-5.64-4.5-6.32V4c0-.83-.67-1.5-1.5-1.5s-1.5.67-1.5 1.5v.68C7.64 5.36 6 7.92 6 11v5l-2 2v1h16v-1l-2-2z" />
          </svg>
        </span>

        <h3 className="text-lg font-semibold mb-2 mt-2">Unread message notifications</h3>
        <p>The widget helps users stay updated with unread message notifications. A badge on the floating widget shows the number of conversations with new replies.</p>
        <p className="mt-2">Inside the widget, a red dot highlights the specific chats that have new messages.</p>
      </div>
    </div>
  </Step>
</Steps>

## A well-rounded AI-native chat experience

<CardGroup cols={2}>
  <Card title="Instant answers" icon="bolt">
    <style jsx>
      {`
                svg {
                  color: #6A00FF !important;
                  fill: #6A00FF !important;
                }
              `}
    </style>

    Delivers immediate responses based on your own documentation and content.
  </Card>

  <Card title="Brand reflection" icon="palette">
    <style jsx>
      {`
                svg {
                  color: #6A00FF !important;
                  fill: #6A00FF !important;
                }
              `}
    </style>

    Reflects your brand visually and conversationally with customizable appearance and tone.
  </Card>

  <Card title="Smart escalation" icon="arrow-up-right-dots">
    <style jsx>
      {`
                svg {
                  color: #6A00FF !important;
                  fill: #6A00FF !important;
                }
              `}
    </style>

    Knows when to escalate to a human agent and does so with full context preserved.
  </Card>

  <Card title="Seamless experience" icon="handshake">
    <style jsx>
      {`
                svg {
                  color: #6A00FF !important;
                  fill: #6A00FF !important;
                }
              `}
    </style>

    Blends automation and empathy—users get help quickly, and your team focuses on conversations that matter.
  </Card>
</CardGroup>
